Capacitive Touch Business Card

Buisness Card


I wrote a post about my design for a capactitive touch business card a few months ago but I have finally had time to build it up and test it out. overall it works well but I could make some improvements. Here’s a quick video of it working:

http://www.youtube.com/watch?v=1e_vGr-gFyw

To implement the capacitive touch I used the PIC10F206 microcontroller. I chose this microcontroller over something bigger like a PIC12 or PIC16 or MSP430 because like the simplicity of this very low cost, low power, 6 pin micro controller.

Here’s the circuit for implementing the capacitive touch

Buisness Card Circuit

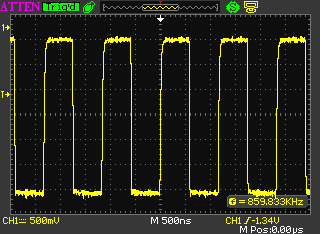
The theory of how it works is that the timer in the microcontroller is used to send a train of pulses out of pin 4 of the microcontroller:

ADS00001


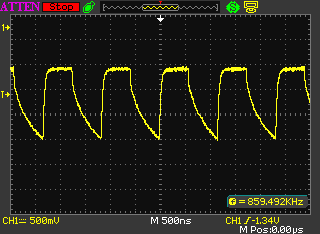
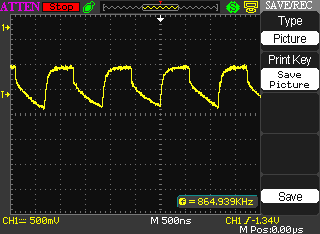
These pulses charge the capacitor made by the capacitive touch pad on the PCB. The voltage on this pad is monitored by the internal comparator on the mircocontroller on pin 1 and it discharges through the resistor R1. The next picture is a scope capture of the voltage on the capacitive touch pad when there is no finger on the pad. (Note that the capacitive of the oscilloscope probe does add enough capacitance to trigger the comparator but we still will be bale to see a difference when a finger is on the pad). Here we can see that it chages up fast when the output goes high and when the output goes low the capacitor cannot discharge through the output due to the diode blocking it, it can only discharge through R1. The larger the capacitance of the pad the slower the discharge which means the bottom value of the ripple will be smaller.

ADS00002

Here we can see the effect of a finger on the capacitive touch pad; there is more capacitance  on the pad and that makes the minimum values of the ripple lower. The internal comparator on the mircocontroller has a 0.6V reference voltage so when the minimum values of the ripple drops below 0.6V it triggers the comparator. If the comparator does not get triggered for a certain amount of pulses set in the software it determines that the pad had been touched and it turns on the LED output.
ADS0000

That’s the basics of how the capacitive touch works on this board, which is one of many different ways it can be implemented.

Andrew

Agilent e3610a Review and Teardown

Agilent Recent had a deal on that if you bought an e36xx power supply you would get an e1272a DMM for free which was a great deal since I needed a bench power supply and a new higher resolution multimeter. I decided to get the e3610a which has the following specs:

  • Linear Power Supply
  • Single Output
  • 30W power Output
  • Two Ranges: 0-6V @ 3A and 0-15V @2A
  • Noise: 2mV p to p
  • Load and Line Regulation: 0.01% + 2mV

It’s a nice solid power supply that has 10 turn potentiometers for the voltage and current limit adjust which feel great and give excellent control of the output, you can easily adjust the output to 10mV and 10mA resolution which can be difficult on power supplies with cheaper single turn potentiometers. Another thing I like about this power supply is that it’s fan-less, nothing is more annoying than test equipment with a loud fan and some I have used in the past can be very loud especially when outputting a lot of power.

This is an older design of power supplies so it doesn’t have some of the fancier features that newer digitally controlled power supplies have like being able to digitally set the output or have PC connectivity but I don’t really need any of those features anyway.

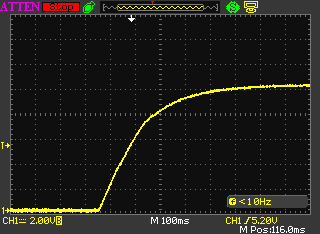
I measured the output step response with the oscilloscope and it shows no sign of overshoot.

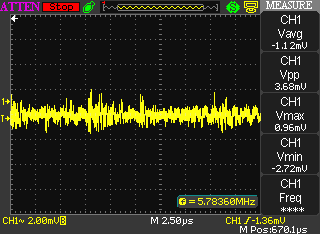
Measuring the output noise of the power supply:

I think that’s more a measurement of the noise floor of the oscilloscope than the output noise of the power supply but that just shows the great performance of the supply.

I would recommend this supply to anyone looking for a solid linear power supply that is going to last them forever. I’ve done some looking around and if you don’t care about getting a used power supply these can be had for very reasonable prices on ebay. Also because of the simple design you could probably even pickup a broken one on ebay and repair it cheap. I know I’m considering getting a second one off ebay.

Here is a small teardown of the Power supply showing the high build quality.

Update and New Test Equipment

I haven’t had time do blog anything for a while since I was busy with school but I finished my final exams last week which concludes my Bachelor’s degree. I have been working on this degree for five years now going to school at nights while working full-time during the day and now I am done. Since the Part-Time degree I did at BCIT is not fully APEGBC accredited my next goal is to write the Fundamentals Exam in Washington to get my EIT and work towards getting my P.Eng.

I also bought some new test equipment. Agilent had a deal for w e3610a power supply and an e1272a digital multimeter that I just couldn’t pass up. I will do a review of both pieces of test equipment in future blog posts.

I have also been working on my Capacitive Touch Business Card which I will blog about too.

Andrew